One of the handiest tasks large language models can do for us is answer questions about a specific collection of information. This is often done using a technique called RAG, or retrieval augmented generation. Instead of relying on what the model knows from its training data, a RAG application searches for the most relevant parts of a document collection, then uses only those text chunks as context for the LLM’s response.
Now, thanks to some relatively new R packages, it’s easy to create your own RAG applications in R. You can even combine RAG with conventional dplyr-like filtering to make responses more relevant, although that requires additional setup and code.
This tutorial gets you started creating RAG applications in R. First, we’ll cover how to prepare, chunk, store, and query a document with basic RAG, using information about Workshops for Ukraine for our demo. You’ll quickly be able to ask general questions like “Tell me three workshops that would help me improve my R data visualization skills” and get a relevant response. Next, we’ll layer on some pre-filtering to answer slightly more specific questions like “What R-related workshops are happening next month?”
The 5 steps of building a RAG app
There are five basic steps for building a RAG application with the ragnar and ellmer R packages:
- Turn documents into a markdown format that
ragnarcan process. - Split the markdown text into chunks, optionally adding any metadata you might want to filter on (we won’t do the optional part yet).
- Create a
ragnardata store and insert your markdown chunks into the store. That insertion process automatically includes adding embeddings with each chunk (embeddings use a lengthy string of numbers to represent a text chunk’s semantic meaning). - Embed a query and retrieve text chunks that are most relevant to that query.
- Send those chunks along with the original query to an LLM and ask the model to generate a response.
Let’s get started!
Set up your development environment
To start, you will need to install the ellmer and ragnar packages if you want to follow the examples. ellmer is the main tidyverse R package for using large language models in R. ragnar is specifically designed for RAG and works with ellmer.
I suggest installing the latest development versions of both—especially ragnar, since useful new features are being added somewhat frequently. You can do that with pak::pak("tidyverse/ragnar") and pak::pak("tidyverse/ellmer"). I’m also using the dplyr, purrr, stringr, and rio R packages, which can all be installed from CRAN with install.packages().
I’ll be using OpenAI models both to generate embeddings and ask questions, so you’ll need an OpenAI API key to use the example code. If you want to use an Anthropic or Google Gemini model to generate the final answers, you’ll also need an API key from that provider. While it’s possible to run the example with a local LLM using ollama, your results may not be as good.
Steps 1 and 2: Wrangle the ‘Workshops for Ukraine’ data
Workshops for Ukraine is a two-hour data science webinar series where volunteers teach a specific topic or skill, often R-related. The goal is to raise money for Ukraine, so participants donate at least $20 or €20 to one of several charities. Participants can attend live or get access to past recordings and materials.
The workshops are listed on a single web page hosted on Google Sites. Our first task is to import the web page using ragnar, which includes several functions for importing web pages and other document formats such as PDFs, Word, and Excel.
In the code below, read_as_markdown() converts the web page into markdown, then markdown_chunk() splits that into chunks. The segment_by_heading_levels = 3 argument splits the text using the original HTML H3 headers, so that each new row is a workshop.
library(ragnar)
library(dplyr, warn.conflicts = FALSE)
library(stringr)
workshop_url
  read_as_markdown() |>
  markdown_chunk(
    target_size = NA,
    segment_by_heading_levels = 3
  ) |>
  filter(str_starts(text, "### "))
Why did I use H3s to split the HTML text? Because I examined the workshop HTML page structure, and it looked like each workshop had its own H3 HTML header. Always check the format, because other web pages may have a different format.
The final filter deletes any rows without a level-3 heading, because those aren’t workshops.

Figure 1: Data frame generated by the read_as_markdown() and markdown_chunk() functions.
The resulting data frame has columns for text, context (header and potentially other information), and start and end locations. The start and end locations help ragnar handle chunk overlapping, which can help retain semantic meaning across text segments.
Step 3: Create a data store and insert chunks
Now I’m ready to create a data store and add my chunks. The code below creates a simple ragnar data store that is set up to use OpenAI’s text-embedding-3-small model when creating embeddings for each chunk. The embed_ollama() instructs the app to use a local ollama embedding model if one is installed on your system. ragnar uses DuckDB for its data store database.
store_file_location
To add chunks to a store, use the syntax: ragnar_store_insert(store_object, chunk_dataframe). This single line of code saves the chunks, generates embeddings, and saves the embeddings:
ragnar_store_insert(store, ukraine_chunks)
If you’re having problems with any of this, as I did initially, make sure you have the latest version of the duckdb R package installed. I ended up having to uninstall it completely and reinstall with pak::pak("duckdb").
There’s one more quick step before you can use the store: Build the search index with the ragnar_store_build_index(store_object) function. Don’t forget this part, or you may find yourself wondering later why you’re not seeing any search results:
ragnar_store_build_index(store)
If you want to know what your store looks like, ragnar has a built-in function for inspecting the store in a browser: ragnar_store_inspect(store).
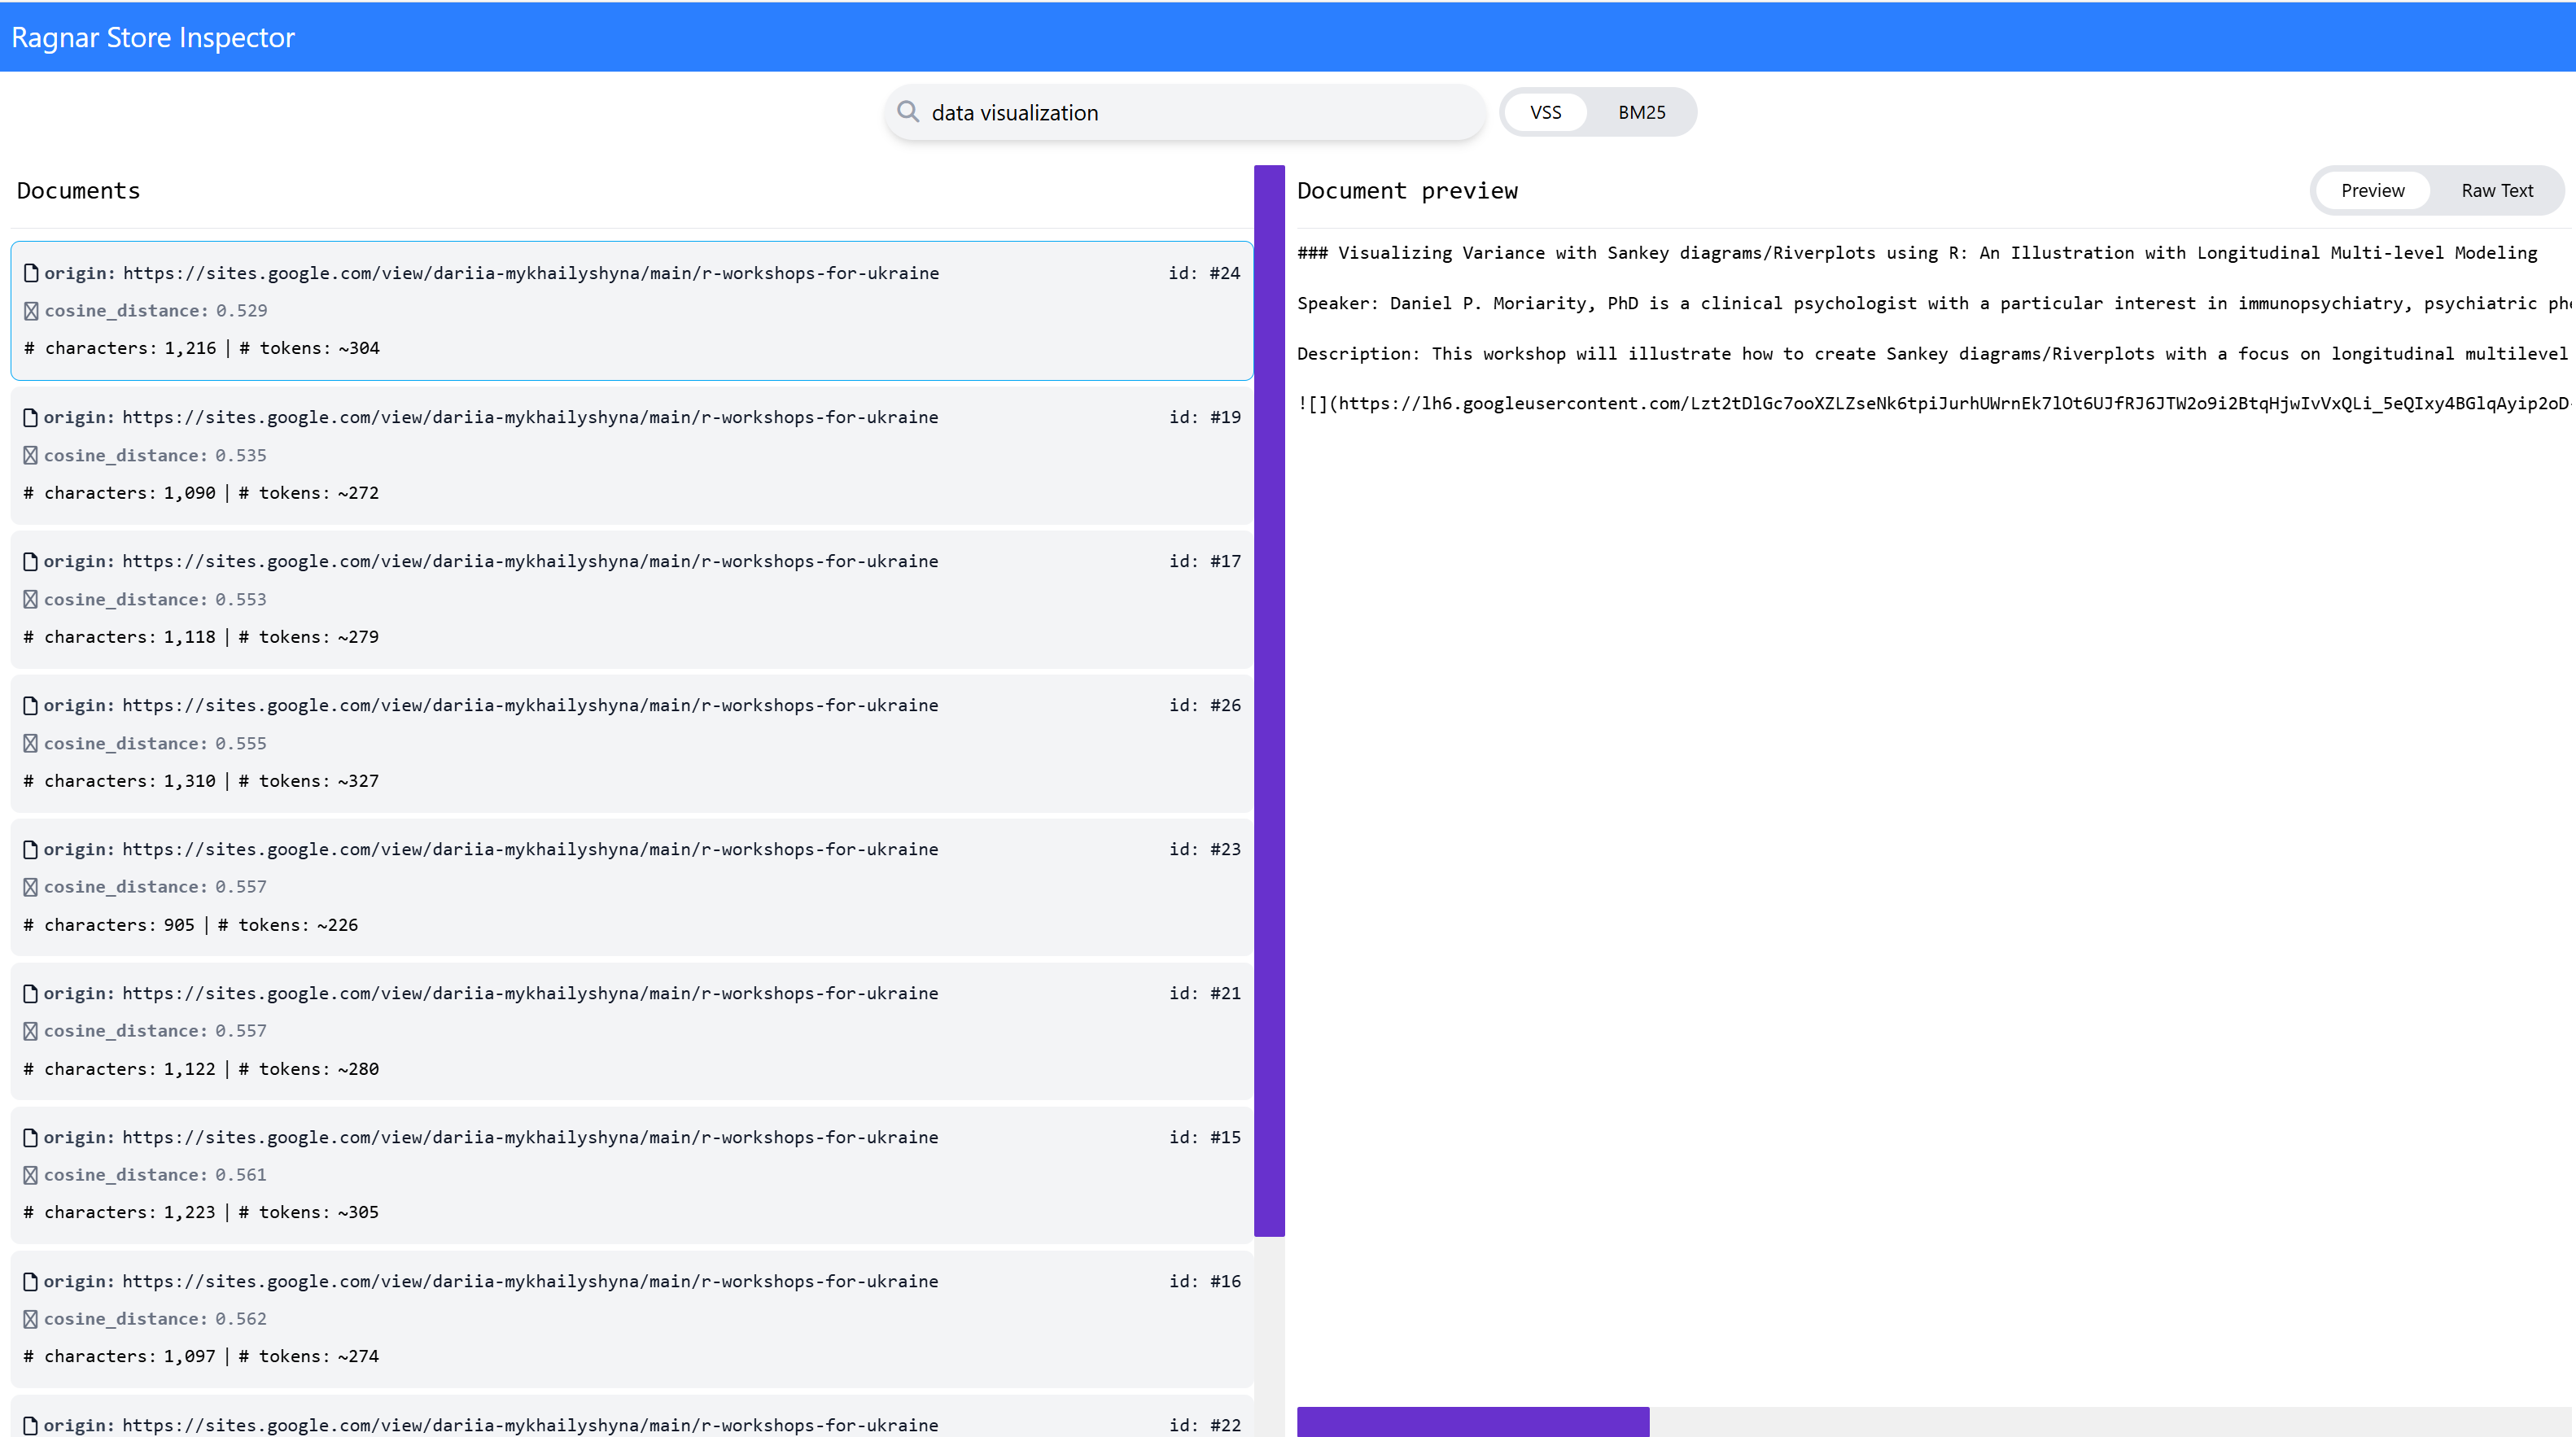
Figure 2: The ragnar package’s ragnar_store_inspect() function lets you view and search a data store.
ragnar comes with two search algorithms by default: BM25 and VSS. BM25 looks for close matches; e.g., “graphs” should match “graph” but not “plots” or “visualizations.”
VSS uses semantic similarity, so in theory, “graph” and “plot” should also match “data visualization.” The similarity matching may not always be as smart as you’d like, so try adding synonyms to your query if you need better results.
Despite the limitations of VSS, I prefer ragnar_retrieve_vss() when working with small text chunks, since there’s a reasonable risk that a workshop may talk about “visualization” and “plots” while a query may only say “graphs.” If you want both VSS and BM25, raganr_retrieve() returns de-duplicated results from both algorithms.
In addition to using ragnar_store_inspect() to view the data store, you can also query a ragnar data store as you would any other DuckDB database in R. Here’s one way to do this:
chunks_df
  collect()
You can close the store connection with DBI::dbDisconnect(store@con), which is a good habit to get into since DuckDB can get finicky if you leave a database write connection open.
Step 4: Query your data store
Now we’re at the fun part!
We can use the store we’ve just created to retrieve text chunks related to a query. If you don’t already have a store connection in your Rsession, use ragnar_store_connect() to connect to the DuckDB file:
store
The following code retrieves the six chunks deemed most relevant to a query using VSS semantic searching (top_k sets how many chunks are returned):
query
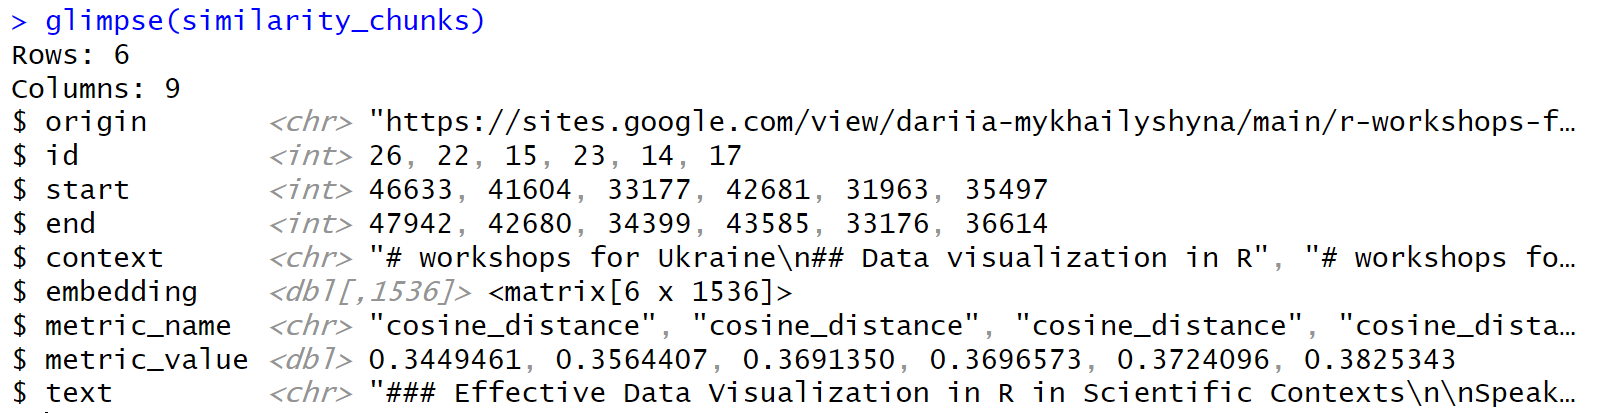
Figure 3: Structure of data returned by a basic ragnar retrieval.
When I ran this code, I got back the following list of workshops: “Effective Data Visualization in R in Scientific Contexts,” “Advanced data visualization in R with ggplot,” “Effective Visual Communication with R,” “Data Visualization with ggplot,” “Color Palette Choice and Customization in R and ggplot2,” and “Efficient R – How to write faster code.” Most of these look pretty relevant to me.
You can easily view all the text in the similarity_chunks results data frame by entering something like the following R code:
similarity_chunks$text |> cat(sep = "n=====n")
Step 5: Generate your answer
The final step is to send the query and retrieved text chunks to an LLM, with instructions to use the retrieved text chunks to generate an answer.
The tidyverse way to do this is to register your ragnar data store as a tool for an ellmer chat. (Tools are functions that LLMs can access to give them additional capabilities. The ellmer documentation has a good overview of LLM tool calling.)
The ragnar_register_tool_retrieve() function is the easiest way to do a basic retrieval. Here’s an example:
# Create a chat object
library(ellmer)
my_chat
Here’s a look at the results in the console:

Figure 4: Results when using ellmer to query a ragnar store in the console.
The my_chat$chat() runs the chat object’s chat method and returns results to your console. If you want a web chatbot interface instead, you can run ellmer‘s live_browser() function on your chat object, which can be handy if you want to ask multiple questions: live_browser(my_chat).
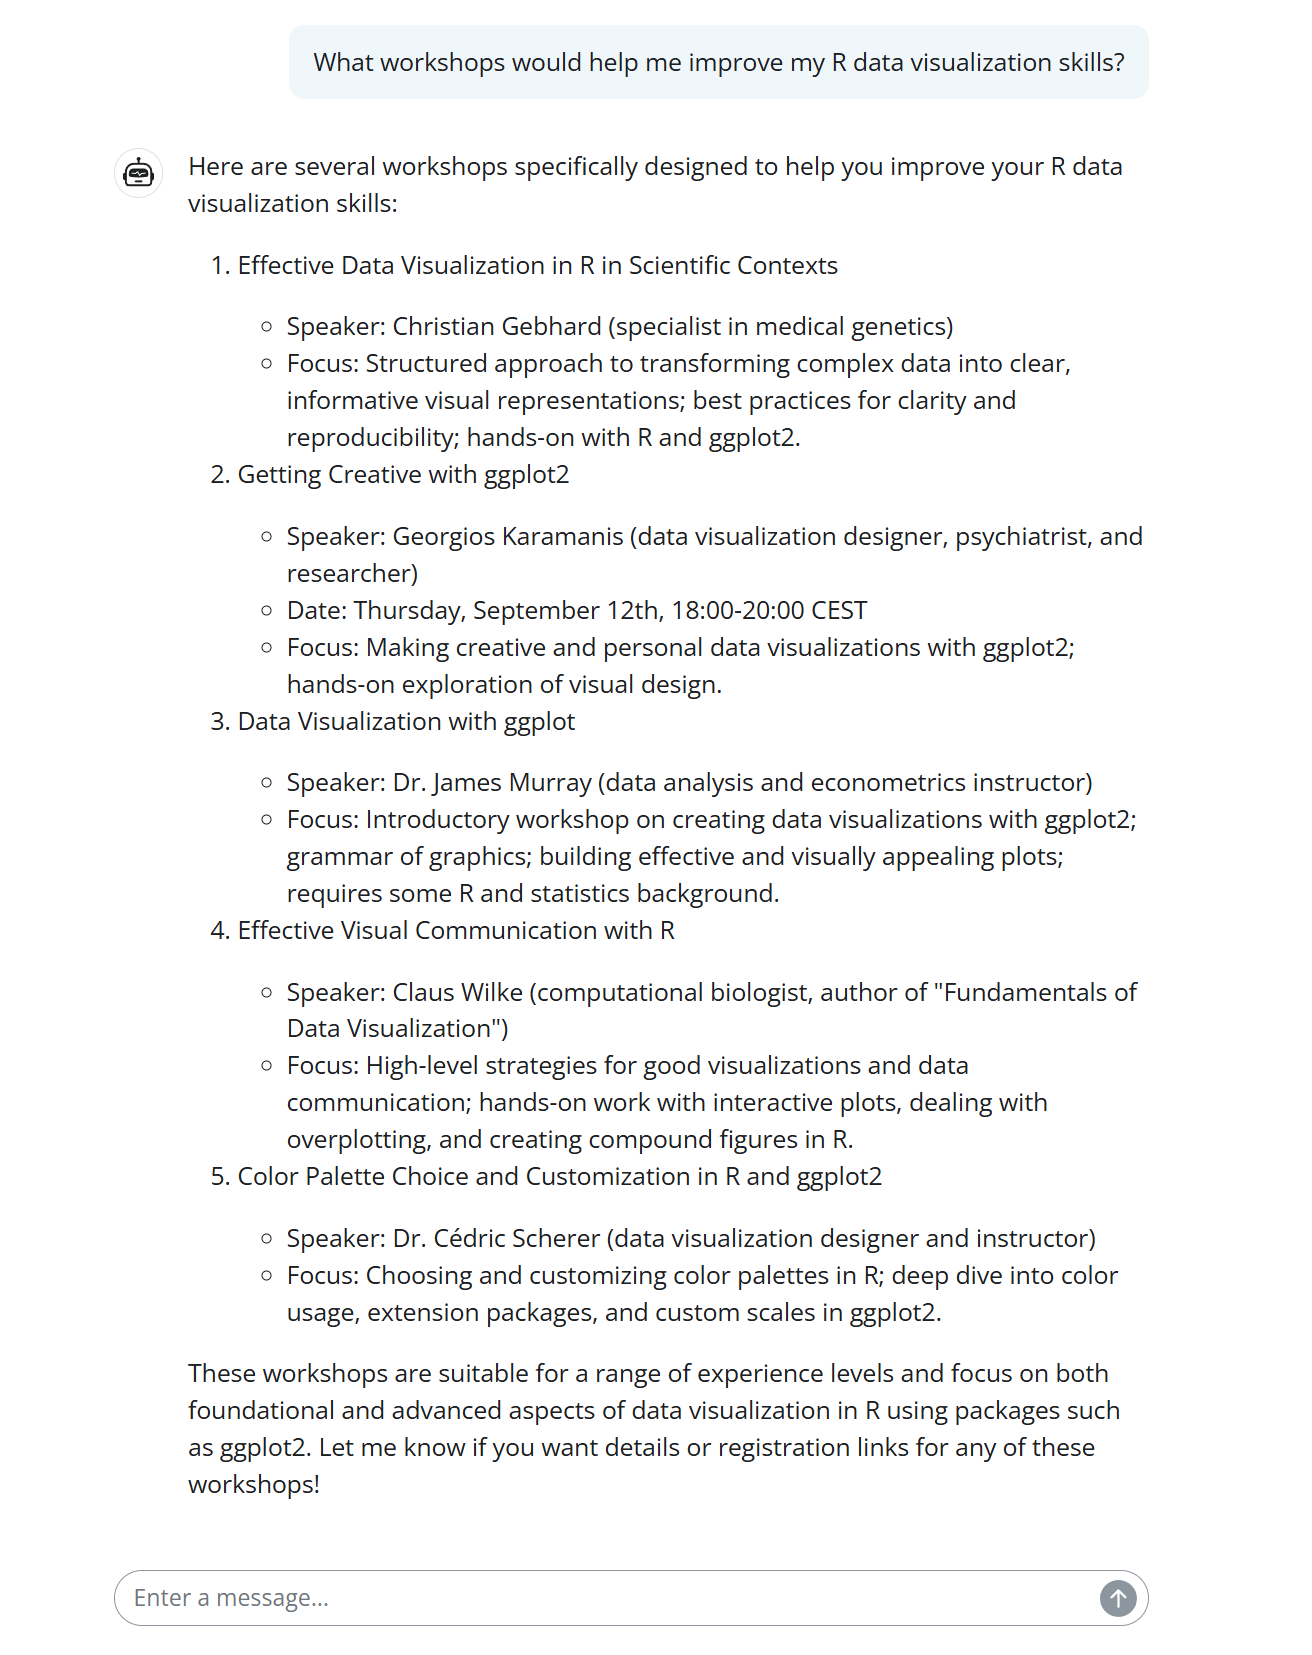
Figure 5: Results in ellmer’s built-in simple web chatbot interface.
Add metadata filtering to the RAG R app
Basic RAG worked pretty well when I asked about topics, but not for questions involving time. Asking about workshops “next month”–even when I told the LLM the current date–didn’t return the correct workshops.
That’s because this basic RAG is just looking for text that’s most similar to a question. If you ask “What R data visualization events are happening next month?”, you might end up with a workshop in three months. Basic semantic search often misses required elements, which is why we have metadata filtering.
Metadata filtering “knows” what is essential to a query–at least if you’ve set it up that way. This type of filtering lets you specify that chunks must match certain requirements, such as a date range, and then performs semantic search only on those chunks. The items that don’t match your must-haves won’t be included.
To turn basic ragnar RAG code into a RAG app with metadata filtering, you need to add metadata as separate columns in your ragnar data store and make sure an LLM knows how and when to use that information.
For this example, we’ll need to do the following:
- Get the date of each workshop and add it as a column to the original text chunks.
- Create a data store that includes a date column.
- Create a custom
ragnarretrieval tool that tells the LLM how to filter for dates if the user’s query includes a time component.
Let’s get to it!
Step 1: Add the new metadata
If you’re lucky, your data already has the metadata you want in a structured format. Alas, no such luck here, since the Workshops for Ukraine listings are HTML text. How can we get the date of each future workshop?
It’s possible to do some metadata parsing with regular expressions. But if you’re interested in using generative AI with R, it’s worth knowing how to ask LLMs to extract structured data. Let’s take a quick detour for that.
We can request structured data with ellmer‘s parallel_chat_structured() in three steps:
- Define the structure we want.
- Create prompts.
- Send those prompts to an LLM.
We can extract the workshop title with a regex—an easy task since all the titles start with ### and end with a line break:
ukraine_chunks
  mutate(title = str_extract(text, "^### (.+)n", 1))
Define the desired structure
The first thing we’ll do is define the metadata structure we want an LLM to return for each workshop item. Most important is the date, which will be flagged as not required since past workshops didn’t include them. ragnar creator Tomasz Kalinowski suggests we also include the speaker and speaker affiliation, which seems useful. We can save the resulting metadata structure as an ellmer “TypeObject” template:
type_workshop_metadata
Create prompts to request that structured data
The code below uses ellmer‘s interpolate() function to create a vector of prompts using that template, one for each text chunk:
prompts
Send all the prompts to an LLM
This next bit of code creates a chat object and then uses parallel_chat_structured() to run all the prompts. The chat and prompts vector are required arguments. In this case, I also dialed back the default numbers of active requests and requests per minute with the max_active and rpm arguments so I didn’t hit my API limits (which often happens on my OpenAI account at the defaults):
chat
Finally, we add the extracted results to the ukraine_chunks data frame and save those results. That way, we won’t need to re-run all the code later if we need this data again:
ukraine_chunks
  mutate(!!!extracted,
         date = as.Date(date))

rio::export(ukraine_chunks, "ukraine_workshop_data_results.parquet")
If you’re unfamiliar with the splice operator (!!! in the above code), it’s unpacking individual columns in the extracted data frame and adding them as new columns to ukraine_chunks via the mutate() function.
The ukraine_chunks data frame now has the columns start, end, context, text, title, date, speaker_name, and speaker_affiliations.
I still ended up with a few old dates in my data. Since this tutorial’s main focus is RAG and not optimizing data extraction, I’ll call this good enough. As long as the LLM figured out that a workshop on “Thursday, September 12” wasn’t this year, we can delete past dates the old-fashioned way:
ukraine_chunks
  mutate(date = if_else(date >= Sys.Date(), date, NA))
We’ve got the metadata we need, structured how we want it. The next step is to set up the data store.
Step 2: Set up the data store with metadata columns
We want the ragnar data store to have columns for title, date, speaker_name, and speaker_affiliations, in addition to the defaults.
To add extra columns to a version data store, you first create an empty data frame with the extra columns you want, and then use that data frame as an argument when creating the store. This process is simpler than it sounds, as you can see below:
my_extra_columns
Inserting text chunks from the metadata-augmented data frame into a ragnar data store is the same as before, using ragnar_store_insert() and ragnar_store_build_index():
ragnar_store_insert(store, ukraine_chunks)
ragnar_store_build_index(store)
If you’re trying to update existing items in a store instead of inserting new ones, you can use ragnar_store_update(). That should check the hash to see if the entry exists and whether it has been changed.
Step 3: Create a custom ragnar retrieval tool
As far as I know, you need to register a custom tool with ellmer when doing metadata filtering instead of using ragnar‘s simple ragnar_register_tool_retrieve(). You can do this by:
- Creating an R function
- Turning that function into a tool definition
- Registering the tool with a chat object’s
register_tool()method
First, you will write a conventional R function. The function below adds filtering if a start and/or end date are not NULL, and then performs chunk retrieval. It requires a store to be in your global environment—don’t use store as an argument in this function; it won’t work.
This function first sets up a filter expression, depending on whether dates are specified, and then adds the filter expression as an argument to a ragnar retrieval function. Adding filtering to ragnar_retrieve() functions is a new feature as of this writing in July 2025.
Below is the function largely suggested by Tomasz Kalinowski. Here we’re using ragnar_retrieve() to get both conventional and semantic search, instead of just VSS searching. I added “data-related” as the default query so the function can also handle time-related questions without a topic:
retrieve_workshops_filtered = !!as.Date(start_date))
  } else if (!is.null(end_date)) {
    # Only end date
    filter_expr
    select(title, date, speaker_name, speaker_affiliations, text)
}
Next, create a tool for ellmer based on that function using tool(), which needs the function name and a tool definition as arguments. The definition is important because the LLM uses it to decide whether or not to use the tool to answer a question:
workshop_retrieval_tool
Now create an ellmer chat with a system prompt to help the LLM know when to use the tool. Then register the tool and try it out! My example is below.
my_system_prompt
If there are indeed any R-related workshops next month, you should get the correct answer, thanks to your new advanced RAG app built entirely in R. You can also create a local chatbot interface with live_browser(my_chat).
And, once again, it’s good practice to close your connection when you’re finished with DBI::dbDisconnect(store@con).
That’s it for this demo, but there’s a lot more you can do with R and RAG. Do you want a better interface, or one you can share? This sample R Shiny web app, written primarily by Claude Opus, might give you some ideas.